Thursday, February 25, 2010

Making the Machine

Having worked in a smaller community most of my career, I've come to take for granted honest responsible people with skills commensurate with hourly rate...but after an unnecessarily expensive electrical nightmare on a simple remodel, I have new appreciation for qualified professional help.


Above-Jimmy of Irish Welding in his shop with Lois's 5' x 5' table sub-structure underway.

Jimmy of Irish Welding is one of those great/qualified locals. He did a great job working with me developing details for the steel counters and helping me solve the issues of the 'machine' . He's knowledgeable, easy to work with and has a fully stocked shop!


Above-a picture of the machine when the idea was still a bit fuzzy!
Below-Prebending the cold rolled rod for the spiral wrap


He also was very generous in letting us work with him in his shop to help control costs. It was a nice design build process. Between myself designing details and resolving issues and Jimmy's expertise in welding and know how and Josh's hard work and extra set of hands, we made quite the object out of another object from the dump!


Above, my hand moving as fast as my thoughts!! Below, 'the machine' being installed.


Jimmy's craftmanship assured strong connections, tidy welds and accuracy where needed. It's a 'wing it' process but good help and a solid design process makes all the difference. Everything worked and fit perfect!


Above-Joe, Matt, Josh and Brad setting the table top on the 'machine'. Photo by Lois Masin.

Magic Plumber

Steve of SouthSide Plumbing has worked out very well. He is competent, confident and willing to try things differently to accommodate my desire for a better product.


Here he is working his magic. I'm tired of wasted spaces under sinks. I decided to make Lois's under sink an experiment and choreographed the plumbing of hot cold water, dishwasher supply and return and waste drain and vent in order to get two drawers under the sink.


He looked at me like I was crazy when I asked if he could keep all the plumbing in the back 2.5" of the cabinet--but he did it!!


Here you can see the two drawers under the sink, full depth and providing lots of storage. Towel rack and sponge bob on the back side of drawer faces!


Thanks Steve and Southside Plumbing!

Finding Homes

I commented the other day that I built Lois's house out of Garbage. Or at least what would have been garbage 15 years ago. That is to say that as recent as last decade we, as a nation, were burning wonderful wood, burying metals without even recycling, and hauling a massive pile of
materials to the dump after every project.


We've hauled 3 truckloads to the dump for an entire renovation of house and garden! This pile of old fascia and pipe salvaged from the Wise project and scraps of flashing has shrunk and continues to await its new purposing.


We used all the lumber from roofing pallets, disassembled decks and walls plus other house parts we demoed. We pulled nails from scraps I used from my last job and we still have a pile of wood left. It's being cut up for stakes and supports for supporting a fence during construction.


We've even found homes for the materials we can't re-use. Some to thrift shops, some donated to a kid's tree-house. The old upper cabinets were delivered to Seattle and the lowers, along with the sink and faucet, to Langley.


Were trying to find homes for the products we don't like such as the Pergo strips we salvaged and this white arbor. We're so committed to recycling Joe's been maintaining ads on Craig's List where we offered any takers one dollar (we give you a dollar) to take this garden thing away.


This concrete sink is still available. Small cracks but usable--a nice casting with a copper edge.

Wednesday, February 24, 2010

The Machine

The machine started out as a tractor implement for aerating soil/lawn. It probably spent a decade acquiring moss and liken and flakes of rust at Island Recycling.

The kitchen shown with Lois's old table as a temp, holding the space where the 'Machine' will go and the custom made Front Door by dbBrad and Island Sash and Door.

After a quick pass thru my brain, a couple hours with Jimmy of Irish Welding and a few more iterations, the design came together.

My favorite is that the helix shape we generated by wrapping cold rolled rod around the fingers of the existing implement not only ties in with the spiral of the heating coils but will match the 8" smooth curve simplistic drawer handles.

Right, Brad custom fitting the 'Machine". Below, Brad, Joe and Josh hold up the 5' x 5' steel table. Warping can be a problem with the welded edge detail, but Jimmy did a great job keeping it clean and flat.

Because the table is at counter height and is so big, the top and the base had to be disassembleable. Simple connections made of parts of
the machine we had to cut off and scraps from Irish Welding's recycled inventory provided attachments for the top, feet for the bottom, and supports for the heater coils.


Below, placing the top on the 'Machine'


Lois has been a very trusting client. I've kept her informed of my design directions, involved her in the evolution of the designs and assured her when necessary, such as on the Machine Table. I'm not sure she had any idea what was coming her way in this case but she Loves it and that's what counts.


Sunday, February 21, 2010

A Stunning Kitchen


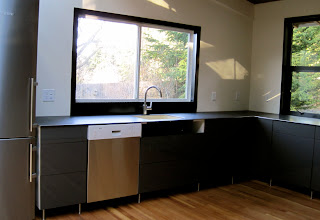
This crisp, stylish kitchen just gets better and better as the details are added one-by-one. Lois picked out a dramatic yellow sink; the existing vinyl window has been cleverly trimmed with dark flashing to match the new aluminum window; and the simple foil cabinets work and look terrific.


The metal counter tops are dynamite with the stainless appliances and the recycled fir flooring sets it all off perfectly.

Just wait for the Island table and the front door, coming this week!


Scraps, Scraps and More Scraps

The chain for the downspout is from Island Recycling. The screens are made from old roofing from the Island County Fair Barn and the roof on the porch is built of salvaged wood from Two Dog Timberworks. The 6x6 came from a side yard pile and even the steel posts are remnants.

Two new decks were created. One off Lois's bedroom and the other at the new south door. Both were made entirely of the wood we salvaged from Lois's original deck.


The studio light fixture was left over cutoffs from cleaning up recycled wood for the previous roof portion of project --stacked until a use came.-- too much nice wood to throw away.


The bridge is left over 2x4's from the project. From decks, walls, under the house and salvage, we had a large pile of 2x4's. Too nice to throw away, too short to use. Great to have a use for many pieces 30" long!

The mulch on the ground is shredded wood waste from Island County Solid Waste. And the pile of logs and forest duff, to be distributed throughout the garden for soil tilth, is from a clearing down the street.

And of coarse the existing site and house have been recycled too, given a new life.

Thursday, February 11, 2010

Sand Cube

The 'cube' is exactly that, a 12"x12"x12" inside dimension container, made from left over plywood from the job.

The cube, out in the elements in front of the Element!

The purpose is to get a control for the heat sink on the fredley job. Initially it allowed me to see how much settled between initial loose fill and packed. Then it sat outside with water and time and settled even more (almost 1/2" from packed)
I weighed the box, multiple times with multiple people for accuracy, and have used the same bathroom scale for subsequent measurements.

The fill was a mixture of existing site sand, silt, and some extra imported sand. It had mixed size particles and even a little clay and silt which have different shapes than sand, which means more material can pack in the same space for higher density which ultimately means higher heat storage capacity.

Think of a box of balls and how much space is left over. Now add smaller balls, foot balls and super balls and you can get many more balls in the same box.


The gist is that the fill I used in the heat sink is 120lbs/cubic foot. It's aver 130 when wet, as when it was installed, but many details were executed to ensure no water is ever in the heat sink. If it is, it will run through and take the heat with it. It's interesting that 10lbs of water, over a gallon, can still fit between all the particles.

When I did all my calculations, i used 120 #/sf, so I was right on. I also used .18-.20 as a range for the specific heat, the materials ability to hold heat. Units are based on water, btu's per pound per degree Fahrenheit.

To check this, I intend to insulate the box with 6" of rigid insulation, r-5/inch. I will then heat the box in an oven to 150 degrees, place it in a cellar at 50degrees, and measure the drop in temperature with time. By knowing the value of insulation and the area and the Delta T (change in temperature) I should be able to generate values as to the materials actual specific heat.

This is an indirect way to solve this problem, but works well with the tools I have. What I really want to know is how much energy it will take to heat up. That will tell me how much heat I can store.

The heat sink early on, before the guest house, pex, insulation or concrete.

Tuesday, February 9, 2010

More Found Objects


Beyond the object from he dump, I've had this heater which Levi of the Re-Store and I took out of a house many years ago. There were two. One is installed in my cottage in Bellingham and the other is to be disassembled and reassembled with a modern twist, in 'the machine'


Here is one of the ceramic heater coils after I pulled it from it's assembly. Above is the thermostat
and wiring in it's original assembly in case I have any problems when I hook it back together.

I wasn't going to use the original thermostat, but 220 thermostats of modernity are not cheap or attractive. Many of them are single pole which means only one 110v


leg of the 220v circuit is interrupted. This thermostat, though 50 years old, works smooth like butter, has good temperature control, great contacts and no mercury so I'm going to keep it. It will reside at the core of 'the machine'. Stay tuned for what the machine is!

More on the Studio Work Table...


Lois is enjoying spreading out her work on the new studio work table.

Not only does the table look good but the photos on the metal look fantastic.


The flat files were painted for a colorful, cheerful, playful look in the studio.


The table top, with its beautiful rolling edges, before it was installed in the studio. The edge though simple is fairly complicated because a rod is welded to the bottom of the outside edge, filled with weld on top and hand ground.


Monday, February 8, 2010

Found Objects

Lois' counters and work spaces are all made out of plate steel.

Here is Lois dusting off her new studio table. The table is one piece of 3/16 hot rolled plate with a welded and hand ground edge.

The table is at counter height, 36" and is 40" wide by 10'-0" long.

This table's found objects include flat files from her mom's art studio, the remnants of steel pipes used to build Lois's porches and left over IKEA stainless steel cabinet legs.

The roller was going to be the pedestal for her kitchen table but needed too many modifications. Incredibly, though, it's been sitting outside for decades yet the bearings ran smooth and I couldn't bring myself to cut up a working tool someone could use for cultivation.

So I found this!!

This object, considerably older and not usable without serious repairs is perfect. Not everyone can see the beauty of this object now, but that's part of the fun--Seeing the grin as people who know my work tell me they can't see it but can't wait to see it.


When done, this object will be as modern as the Ikea shiny grey cabinets, as functional as the skylight and as unique as a desert dolphin. We have already begun calling it 'the machine'

Stay tuned to see how it works and what it does!

Sunday, February 7, 2010

RE-Do

Here is a pile of what many would call garbage, waiting to be RE-evaluated.

The process of quickly stacking these objects was not only fun, it was informative and allowed me to get a feel for the materials I've hoarded but not used.

In sync with RE-Johns process of creating RE-art, I took more than expected pleasure in the therapy of RE-creating something so temporary that the only way to enjoy it was to enjoy the process of building it.

It might just be a pile of steel, but it's a RE-pile with punch, and a drivers seat!

Done as a quick, temporary sculpture, it's life will be short as it awaits to be RE-created into RE-art by Re-John of Re-assemblage at the RE-house.

Greene Partners


These shots are from Thanksgiving, when I traveled to Lopez Island to visit Joe and Nancy Greene's residence which has continued to be a source of inspiration to me in its eloquent simplicity and timeless details.


I've been visiting the Greene Partners for two decades now and have yet to leave without being inspired by a new view of their house or a new point of view from them.

Much of the work I do may stem from the gentle guidance I have received over the years from these two wonderful and talented people.

Left: Simple walls that transition the building to the open landscape.
Below: A simple walk adds enjoyment to the approach, no matter what the weather is doing!


]


Being true to the materials is important and in all five pictures, the rocks, concrete, plants and building are exactly what they claim and want to be.