Wednesday, November 25, 2009

Fredley Home Published


The Fredley home, built by Brad Hankins of Design Build Brad (dbbrad) was published recently by the Seattle Times, and can be found in the Pacific Northwest Magazine, November 22, 2009 (click here). The Seattle Times article was photographed by Benjamin Benschneider but unfortunately those photographs could not be published on this blog. To enable you to see other photos of the home and the work of Lois Mason, see above. To see the excellent photographs by Benjamin Benschneider, go to the site referenced above.

On Whidbey, a unified home from multiple recycled parts
FRAN ABEL and Ed Anderson's new home is three separate little buildings that look as if they might have started out fitting snugly together into a single home. You can imagine some force of nature causing the sharp angles and winged rooflines to burst apart, then settle back down into a cluster within the hollows of the landscape. If the parts could be fit back together, their shapes might interlock as seamlessly as a 3D jigsaw puzzle.
This Whidbey Island home embodies the idea that green doesn't mean dull, and innovative design can be as practical as it is cool. It doesn't hurt that Abel is a garden designer experienced in water catchment and native plantings. Her son, Brad Hankins of B.R.A.D. Building Renovation and Architectural Design (This name is incorrect, it should be dbbrad), who designed and built the house, is relentless in researching green technology and searching out materials to repurpose.
"This place started out with a patina and will only get better," says Hankins, pointing out that little maintenance is needed on materials that have already endured wind, rain and time. The windows and the roofing are new, but that's about all this family purchased at a store. "You have a design, and it evolves as you find the materials," he explains. Despite the contemporary flair of his design, the home's siding of worn metal and old barn wood leaves you guessing as to whether it's remodeled or new.
Which is just how Abel and Anderson like it. They wanted their new place to fit into the neighborhood. A major reason they moved into Langley from their view property outside of town was to gain the sense of community that comes from having neighbors nearby and town an easy walk or bike ride away.
Not only did the family put hundred-year-old barn wood, scrap steel and 40-year-old chairs found on Craigslist to good purpose, they even used waste from the job. The greenhouse adjoining Abel's vegetable garden is built of leftover windows, stone and scraps of insulation. Very little needed to be hauled away after the project was completed.
So how much money did the family save by such skillful repurposing? "Zero," says Hankins, who explains that it takes lots of time to transport, store, clean and detail materials with a previous life. "It may not save money," chimes in Abel, "but it feels good to do, and you can't buy wood like this anymore."
The entire project is a scant 860 square feet, spread out over the three buildings. Every space is multipurpose; the kitchen, dining and living rooms share a single space. The bedroom converts to a yoga room when the Murphy bed is folded into the wall, and its hallway is lined with books. The "barn" houses a workshop, guest room/study, laundry and plenty of storage for bikes and boats.
The main building is heated by solar power collected in vacuum tubes on the roof and stored in a heat sink beneath the concrete floor. "This building will take care of itself," says Hankins. The bedroom has a hydronic heater with solar storage tank. Because this high-mass heat-storage system is a bit experimental, Hankins buried 24 sensors to create a data-collection center that will monitor the heat sink to see how it's responding to all the weather factors that influence the system.
"Three separate buildings isn't as efficient," acknowledges Abel, "but you get some privacy." Since Anderson likes rock 'n' roll and Abel prefers classical music, a little division between buildings makes for smoother family dynamics. Each little building has its own relationship to the outdoors, its own deck or terrace.
"Ed and I love coming outside in the morning and experiencing the weather, feeling the wind, hearing the birds," says Abel of their open-air journey between bedroom and main house.
And how about the dynamics of a son designing and building a house for his mother? "Having a client with great taste is such an asset," says Hankins with a grin.

Monday, November 23, 2009

Another Water System

Another storm water system, similar to the system at the Fredleyonwhidbey site, is being installed at the Lois remodel. This system, when complete, will have a small stream that will catch all the roof water, directing it to a pond. The pond will overflow into a wetland, where sand for drainage will be added. The wetland will also be planted with filtration sedges. Because the Greenbank site is not sandy, but clay, two additions are being added to the system for "100 year flood" insurance. A path, on the downhill side of the wetland/pond will be a long French drain-type catch basin. On the downhill side of the path a native plant hedgerow of wild roses, snowberry, Oregon grape, salad and ferns will be planted to bind the soil, eliminate any runoff or erosion, and provide wildlife habitat.

Even in the incomplete stages of this system, the water is finding its way to the pond and wetland. The wetland will drain, after a hard rain, after a day or two. With sand and plants, we are hoping to speed up the surface draining to a few hours.

Following are two site pictures of the system in its earliest stages. These pictures were taken after several days of perpetual rain.


Heat Sink


There is a whole book to be written on the heat sink and I intend to do that. I've got various portions underway but it will take time.

It will probably be 2 years before the ground in and around the heat sink comes up to temperature.

Here Ben and Kent of dbBrad wrestle the stubborn pex into place at the base of the heat sink, just above the bottom layer of insulation-actually 3 layers of 2" for total of r-30.

Needless to say there is a lot of proprietary information and a few huge unknowns--how well does it work or how much energy does it save and is it cost effective.

To better understand the migration of heat, I've buried 18 sensors which will record temperature, time, and date as well as control values such as ambient temperature both inside and out. I will then be able to compare this to solar production values and local weather data to generate an objective analysis as to the performance of the high mass heat storage system.

It is my hope to show that a little smart planning, a bunch of sand and some solar panels can help heat a house, even in challenging solar heating regions like the pacific north west.

The heat sink is not heated directly. The solar system was sized to accommodate heat and DHW (Domestic Hot Water) at spring and fall equinox. Collector tilt is optimized for this period.

Even so, I have a massive heat surplus in the summer and the 200k pounds of thermal mass will be heated with the surplus, only after my primary holding tank is at temperature during the non-heating season. We also have hydronic heaters so when there is solar energy available, the heaters will use this first. This is the 'primary' heat source, per WEC (Washington State Energy Code)

The catch is that my sand can only hold 10-20 million btu's and it's loosing heat all day, every day, all year long. An interesting thing here is that bigger houses have a smaller perimeter to area ratio and can hold more sand which makes them better candidates for high mass heat storage systems.

In the above picture, Ben is over at what we call the Bouquet, a lovely arrangement of tubes, hoses, pipes and wires. Anderson Electrical and Brad are placing the direct burial stainless steel sensors and mapping their exact location. Below are shots showing wing insulation, thermal breaks and the table vaults for the main living.

Heat loss is a function of insulation (resistance to heat transfer), DeltaT or change in temperature, Area of skin and Time. The equation is UA(delta)T . You would use this to calculate heat loss through your envelope in order to size a furnace for the coldest day of the year. Predicting heat loss and gain for a solar house is a bit more complicated. Predicting the movement of heat through a bed of sand, across different mediums over the course of a year is unrealistic. Somehow my dad, Barry Hankins, did it.

Doing transient heat analysis we were able to look at how the earth around the heat sink would heat up and how long it would take for a given constant temperature in the bottom of the heat sink to exceed a maximum value at the slab. (over heating is an issue which I've also solved with a heat dump dump--at Fredley's the outside slab shunts heat which in late summer will make for extended outdoor use)

As a result of studying the transfer of heat (simulating the migration of heat and varying conductive values, temperatures, and time) and looking to optimize retention and increase performance, we installed perimeter insulation (I call it wing insulation) just under the surface and used it also as a water deflector/collector.

In these pictures you can see that the slab has no insulation (should be under the re-bar) but the entry slab, covered slab and perimeter earth do.


In this case, the surplus heat we dump into the bottom will take almost 2 months to get to the slab. Projections suggest we'll be able to maintain the slab over the heat sink at about 65 degrees not dropping below 60 by spring.

But this won't heat the house when it's freezing out. What it does I refer to as thermal ballast. It provides temperature stability. The house may not stay totally warm, but it will never get cold. Ever.

It's working already and the vacuum tubes weren't hooked up this summer and so far there has been no heat added to the heat sink actively, only passively by direct solar gain this summer. At the middle of last winter the slab and concrete underneath were at 44 degrees. At the end of summer the slab was at 65 degrees. It is currently as 60 degrees. I expect going into next winter to have the slab around 75 degrees.


Thursday, November 19, 2009

Logo

Quality used to be what it isn't!

With the roof done, eve's extended and gutters on, work was able to progress inside and outside this week.

Matt begins shingling the wall. The aluminum window from Island Sash and Door will be in soon. The door by dbBrad is ready to be installed now that the waterproofing at the entry deck and door threshold are complete. Flush transitions, always more attractive, are great for ease of use but not always so friendly with wind and rain.


Inside, recycled spruce shelves, from the same lot as the 2x8's on FrEdLey notch into a recycled doug fir post over which resides the 24' long steel beam and the beautiful 18' long Crystalite skylight.

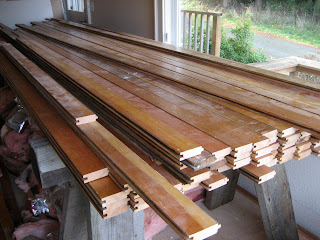
The 2 1/4 fir flooring pictured is from ReStore. We came up short on our initial purchase (which was supposed to be by the square foot) and now they are out. Finding more flooring has been difficult as the quality of new fir flooring isn't what it used to be. Or rather fir (wood in general) used to be what it isn't! Second Use of Seattle will be supplying the remainder.

Sunday, November 8, 2009

The New Skylight Arrives!

Lois, who has been out of town for a week, came home to a new roof, new flooring three-quarters finished, and a new skylight. Lois' comment about the week's activities was that it was much more fun to see her home going back together than watching it be torn apart. The first photo is of the 5'x18'skylight in place. The second photo shows taking off the plastic that's been between the interior of the home and the rain the last few weeks. The third and fourth photos are putting in the glazing. The last photo is putting the skylight frame in place.


Wednesday, November 4, 2009

New Roofing is Installed

Keeping layout simple and using multiples of standard product dimensions, the roof framing, sheathing, roofing and even the front porch and skylight have a common denominator (12") allowing them to repeat and cycle in rhythm.


The roofing over the porch runs cleanly through from the skylight to the edge of the porch. Another detail laid out during schematic design based on the buildings original structural grid, but then resolved and executed during construction. In the design build process, not having to draw exact details up front saves on initial design and permitting costs, but allows for a sophisticated completed look with craftsmanship and attention to detailing occurring throughout the entire process.


Except for the skylight, and some gable edge trim, the roof is almost finished. Galvanized 5" half round gutters go on next, where the water will be collected in the rain catchment/Koi pond. The porch, though, already has it's stealth, square edged, custom gutter installed.


Cleaning up Flooring

The last step of preparing the recycled flooring is running it through the planer. Here Joe and Brad run it through.Prior to the planer, the boards must have the many years of accumulated dirt and grim removed from the grooves so the tongue and grooves will fit tightly.
Cleaning up the boards is tedious work because one must be careful to avoid chipping or splitting the edges. The flooring needs to fit tightly, looking as good as new, seeing a second life as beautiful as the first.

New Flooring

The studio has newly recycled wood flooring installed.The living room is about to have a newly completed wood floor.

The flooring purchased from ReStore in Bellingham, after it's been cleaned up.